Discover the Kitchen Tool Everyone Is Raving About!
- • Precision Engineered: Sharp blade with durable craftsmanship.
- • Comfort First: Ergonomic design for effortless slicing.
- • Stylish & Strong: Elegant wood handle meets stainless steel strength.
- • Risk-Free Pick: Thousands of happy home chefs can’t be wrong.
- • Today’s Deal: Just $29.95 instead of $99.85 — limited-time offer!
This post may include affiliate links — learn more here .
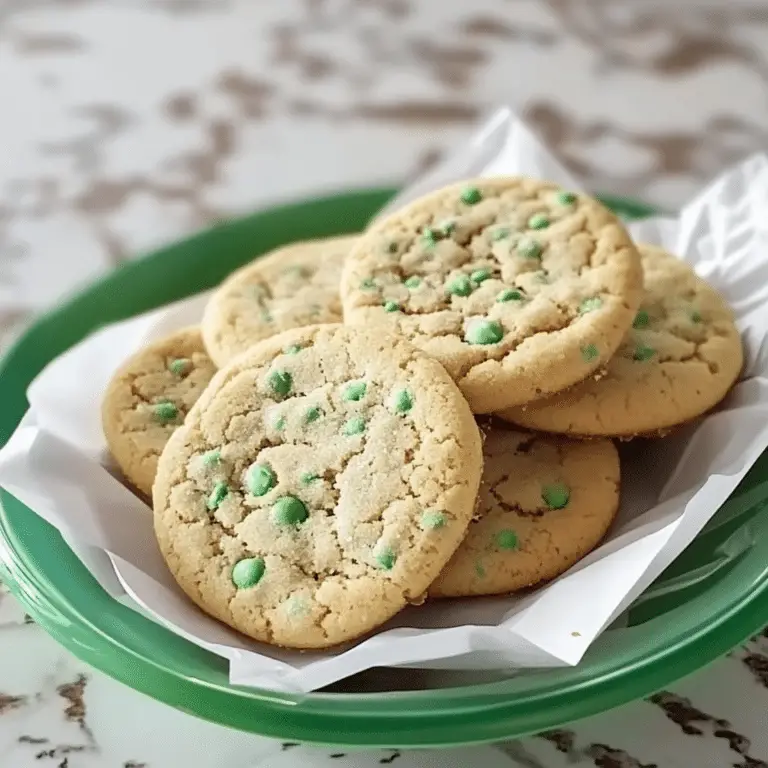
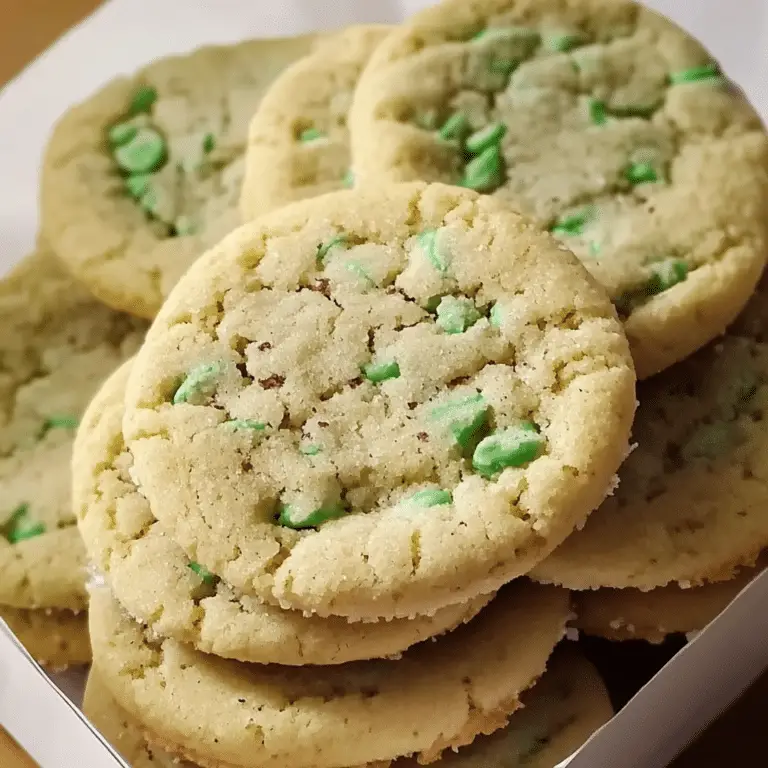
Butter Mint Cookies are soft, buttery delights infused with the refreshing flavor of mint. These melt-in-your-mouth cookies are perfect for the holidays, offering a light and elegant treat that pairs beautifully with hot cocoa or coffee. Their pastel hues or festive designs make them as lovely to look at as they are to eat.
I first made Butter Mint Cookies to add a unique twist to my holiday cookie tray, and they quickly became a standout favorite. The dough, enriched with butter and a hint of peppermint extract, is tender and easy to work with, making these cookies a joy to bake. A light dusting of powdered sugar or a drizzle of white chocolate adds the perfect finishing touch.
What I love about this recipe is its versatility and charm. You can shape them into rounds, use cookie cutters for fun shapes, or roll them into logs and slice them for a quick baking process. Add a few drops of food coloring for a pastel finish or match the theme of your celebration. Whether served at a holiday party, shared as a gift, or enjoyed as a cozy treat at home, Butter Mint Cookies are a refreshing and delightful addition to any dessert spread.
Perfect for:
- Holiday cookie exchanges
- Tea parties
- Festive celebrations
- Mint lovers
- Homemade gifts
Why You’ll Love This Recipe
Here are 10 reasons why these Butter Mint Cookies will become your go-to indulgence:
- Buttery Goodness: Rich and creamy, these cookies are a true buttery delight.
- Refreshing Mint Flavor: A hint of mint balances the sweetness beautifully.
- Soft and Tender Texture: They crumble perfectly with every bite.
- Holiday Vibes: Their refreshing flavor and festive appeal make them perfect for the holidays.
- Customizable: You can adjust the mint flavor intensity or add food coloring for a fun twist.
- Quick and Easy to Make: The simple recipe ensures perfect results every time.
- Great for Gifting: These cookies are a thoughtful homemade gift.
- Perfect Pairing: Pair with tea, coffee, or hot cocoa for a cozy treat.
- Minimal Ingredients: Requires pantry staples, making it easy to whip up anytime.
- Kid-Friendly: Both fun to make and enjoy with kids.
Preparation and Cooking Time
- Total Time: 1 hour
- Preparation Time: 20 minutes
- Cooking Time: 12 minutes per batch
- Chilling Time: 30 minutes (optional, for firmer dough)
- Servings: 24 cookies
- Calories per cookie: Approximately 80-90 calories
- Key Nutrients: Protein: 1g, Carbs: 10g, Fat: 4g
Ingredients
For the Cookies:
- 1 cup unsalted butter, softened
- ½ cup powdered sugar
- 1 teaspoon mint extract
- 1 ¾ cups all-purpose flour
- ¼ cup cornstarch
- A pinch of salt
- Food coloring (optional, for a festive touch)
Optional Decorations:
- Powdered sugar for dusting
- Melted chocolate for drizzling
- Sprinkles or crushed candy canes for topping
Ingredient Highlights
- Butter: The star ingredient for rich flavor and soft texture.
- Mint Extract: Delivers the signature cool, refreshing flavor.
- Cornstarch: Ensures the cookies are tender and crumbly.
- Powdered Sugar: Adds sweetness and a smooth consistency.
Step-by-Step Instructions


Prepare the Cookie Dough:
- Cream Butter and Sugar: In a large bowl, beat the butter and powdered sugar with an electric mixer until light and fluffy.
- Add Flavoring: Mix in the mint extract. If using food coloring, add a drop or two for desired color.
- Combine Dry Ingredients: In a separate bowl, whisk together the flour, cornstarch, and salt.
- Mix Wet and Dry: Gradually add the dry ingredients to the butter mixture, mixing until just combined. Do not overmix.
Chill and Shape:
- Chill Dough: For firmer cookies, wrap the dough in plastic wrap and chill for 30 minutes.
- Shape Cookies: Roll dough into 1-inch balls and place on a baking sheet lined with parchment paper. Press gently to flatten slightly.
Bake:
- Preheat Oven: Preheat oven to 350°F (175°C).
- Bake Cookies: Bake for 10-12 minutes or until edges are just set but not browned. Let cool on the baking sheet for 5 minutes, then transfer to a wire rack.
Decorate:
- Optional Toppings: Dust with powdered sugar, drizzle with melted chocolate, or sprinkle with crushed candy canes for extra flair.
How to Serve
Here are 10 serving suggestions for Butter Mint Cookies:
- As a Festive Treat: Perfect for Christmas platters or gift boxes.
- With a Cup of Tea: A light, refreshing pairing for tea lovers.
- After-Dinner Dessert: Serve with coffee for a satisfying end to a meal.
- With Hot Cocoa: A delightful companion to a cozy winter drink.
- For Cookie Swaps: Impress guests at cookie exchange parties.
- With Ice Cream: Pair with vanilla or chocolate ice cream for a fun dessert.
- As Party Favors: Package in clear bags for a thoughtful party favor.
- As Edible Decorations: Use as edible ornaments on your holiday table.
- With a Minty Beverage: Pair with mint tea or a peppermint mocha for a theme.
- On a Dessert Platter: Include alongside brownies and truffles for variety.
Additional Tips
- Chill the Dough: Always chill your dough for at least 30 minutes before baking to prevent the cookies from spreading too much.
- Use Quality Butter: Use unsalted, high-quality butter to get the rich, authentic butter flavor.
- Peppermint Extract: If you love a stronger mint flavor, add more peppermint extract (a few extra drops) to your dough.
- Coloring Options: You can add a few drops of green food coloring to give the cookies a festive look.
- Crushed Peppermints: Sprinkle crushed peppermint candies on top before baking for a festive touch and extra crunch.
- Dust with Powdered Sugar: Dust baked cookies with powdered sugar for a beautiful, snowy effect and subtle sweetness.
- Experiment with Shapes: Use cookie cutters of different shapes for a fun presentation, such as hearts, stars, or Christmas-themed shapes.
- Mix in Chocolate Chips: Add white chocolate chips or dark chocolate chips for a delightful twist.
- Sift Flour: Sift your flour before adding it to your dough to prevent lumps and create a smoother texture.
- Store Properly: Keep your cookies in an airtight container at room temperature for up to a week, or freeze them for longer storage and freshness.
Recipe Variations
- Chocolate Mint Cookies: Add cocoa powder for a chocolatey twist.
- Lemon Mint Cookies: Substitute part of the mint extract with lemon zest for a citrus kick.
- Vanilla Butter Cookies: Replace mint extract with vanilla extract for a classic flavor.
- Gluten-Free Version: Use a 1:1 gluten-free flour substitute.
- Layered Cookies: Sandwich two cookies with a thin layer of mint-flavored frosting.
- Festive Designs: Use cookie cutters and add colorful icing for holiday shapes.
- Peppermint Crunch: Mix crushed peppermint candies into the dough for added texture.
- Nutty Variation: Add finely chopped nuts like pistachios or almonds for crunch.
- Matcha Mint Cookies: Add a teaspoon of matcha powder for a green hue and earthy flavor.
- Vegan Option: Substitute butter with plant-based alternatives like coconut oil.
Special Equipment
- Stand Mixer or Hand Mixer – For creaming butter and sugar evenly and mixing dough ingredients.
- Silicone Baking Mats – Provides a non-stick surface, ensuring cookies don’t stick to trays.
- Rolling Pin – Useful if you’re rolling out dough for cookie shapes or patterns.
- Cookie Cutters – Various shapes and sizes to create decorative cookies.
- Piping Bag and Tips – For detailed decoration with icing or adding a swirl design.
- Cooling Racks – Allow cookies to cool evenly without sogginess.
- Measuring Cups and Spoons – Ensure accurate measurements for consistent results.
- Spatula – For transferring cookies onto trays and scraping bowls.
- Pastry Brush – Helps apply egg wash or glaze for a shiny finish.
- Digital Kitchen Scale – Ensures precise measurements for consistent baking results.
FAQ Section
- Can I use salted butter?
Yes, but reduce the added salt in the recipe. - Can I make the dough in advance?
Absolutely! The dough can be refrigerated for up to 2 days or frozen for up to a month. - How do I store these cookies?
Store in an airtight container at room temperature for up to 1 week. - Can I skip the mint extract?
Yes, substitute with vanilla or almond extract for a different flavor. - Why did my cookies spread too much?
Ensure the dough was properly chilled before baking. - Can I make them gluten-free?
Yes, use a gluten-free flour blend. - Can I freeze baked cookies?
Yes, freeze in a sealed container for up to 3 months. - How do I get vibrant colors with food coloring?
Use gel food coloring for brighter hues without altering the dough’s consistency. - What can I pair these cookies with?
Hot beverages like tea, coffee, or hot chocolate complement them perfectly. - Can I make them dairy-free?
Use vegan butter or margarine for a dairy-free version.
Conclusion
Butter Mint Cookies are delicate, melt-in-your-mouth treats that combine buttery richness with the refreshing hint of mint. These soft and tender cookies are a delightful twist on classic butter cookies, offering a cool, minty finish that’s perfect for the holiday season or any occasion calling for something sweet and unique.
Decorate them with pastel colors, a drizzle of chocolate, or a light dusting of powdered sugar for added charm. Whether served with tea, shared at parties, or given as a thoughtful homemade gift, these cookies are sure to be a hit with their subtle flavor and irresistible texture.
I’d love to see your Butter Mint Cookie creations! Share your photos on Instagram and tag me so I can admire your deliciously creative baking. Don’t forget to comment and let me know how you made them your own—perhaps with a hint of chocolate chips, a swirl of food coloring, or a sprinkle of crushed candies for extra flair!