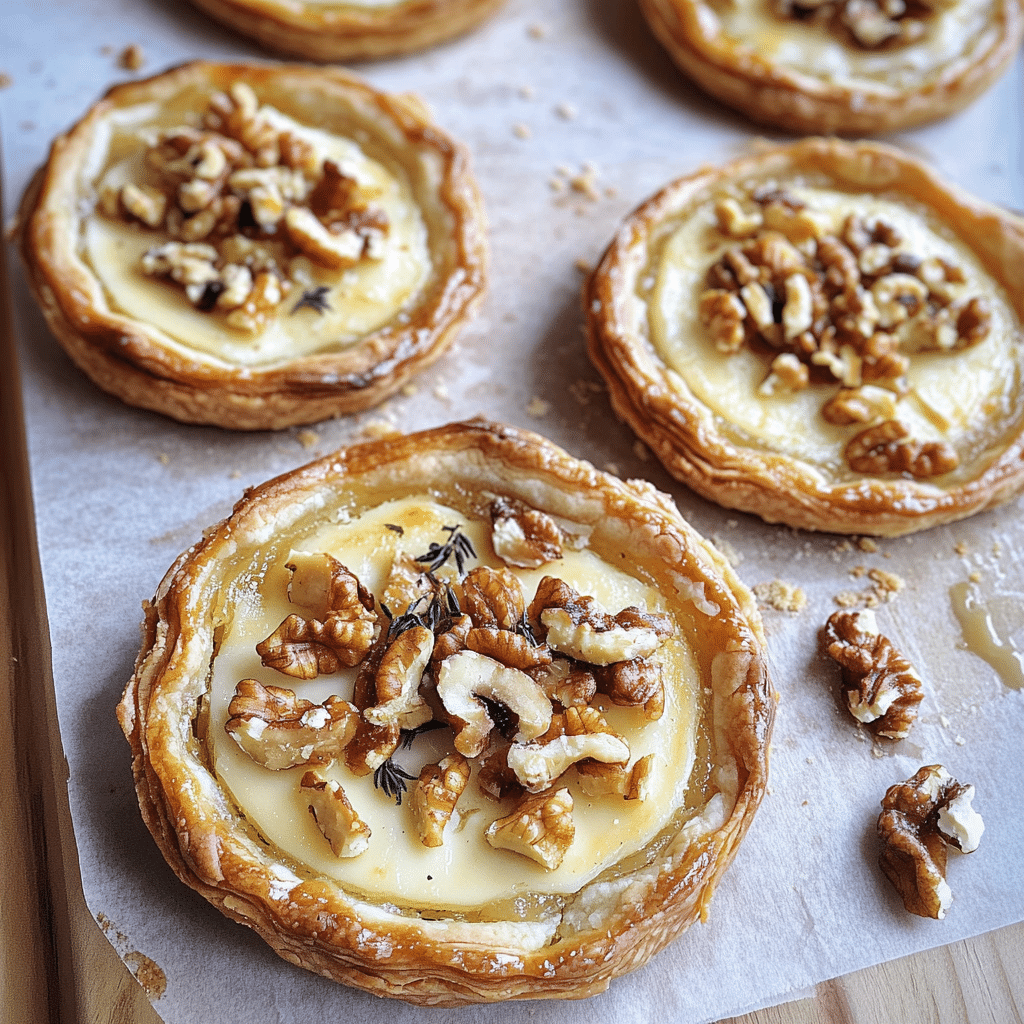
Goat Cheese and Walnut Tarts are a savory, bite-sized treat that combine the tangy richness of goat cheese with the earthy crunch of walnuts, all nestled in a flaky pastry shell. These tarts are perfect for appetizers, parties, or as a light meal, with each bite offering a delightful balance of creamy cheese and crunchy, toasted walnuts, enhanced with a drizzle of honey or balsamic reduction for a touch of sweetness.
I first made Goat Cheese and Walnut Tarts when I wanted to try a new appetizer for a gathering, and they were an instant hit. The combination of the creamy goat cheese and the crunchy walnuts created the perfect bite, and the pastry was buttery and crisp. I loved how easy they were to put together, and they were a delicious addition to any party spread.
What’s great about these tarts is how versatile they are. You can switch up the nuts, try adding caramelized onions or herbs like rosemary for added flavor, or drizzle them with a bit of honey or balsamic glaze for extra sweetness. Whether you’re making them for a fancy dinner, casual gathering, or even as a snack, these goat cheese and walnut tarts are sure to be a crowd-pleaser!
Perfect for:
- Appetizers
- Dinner parties
- Special occasions
- Wine pairing
- Goat cheese and nut lovers
Why You’ll Love This Recipe
Here are 10 reasons why these Goat Cheese and Walnut Tarts will become your go-to savory treat:
- Balanced Flavor Profile: The creamy goat cheese pairs perfectly with the toasty walnuts, creating a rich, satisfying bite.
- Flaky and Buttery Pastry: The tart shells are light, crisp, and buttery, providing the perfect contrast to the smooth cheese filling.
- Quick and Easy to Prepare: These tarts come together in just a few steps, making them a stress-free choice for entertaining.
- Customizable Filling: Add herbs, spices, or even caramelized onions for extra layers of flavor.
- Impressive Presentation: These tarts look as good as they taste, making them a perfect dish to serve at a dinner party.
- Perfect for Any Occasion: Whether it’s a holiday gathering or a weeknight dinner, these tarts are the ideal addition to any menu.
- Make-Ahead Option: The tarts can be prepared in advance, allowing you to enjoy them without any last-minute fuss.
- Versatile Pairing: Serve them with a variety of beverages, from mocktail to sparkling water, for a truly elevated experience.
- Savory with a Touch of Sweetness: A drizzle of honey or balsamic glaze on top adds a delightful sweet contrast to the savory filling.
- Small but Satisfying: These tarts are the perfect bite-sized appetizer that will leave your guests craving more.
Preparation and Cooking Time
- Total Time: 1 hour 15 minutes
- Preparation Time: 30 minutes
- Cooking Time: 45 minutes
- Servings: 12 tarts
- Calories per serving: Approximately 250-300 calories
- Key Nutrients: Protein: 6g, Carbs: 18g, Fat: 20g
Ingredients
For the Tart Shells:
- 1 ½ cups all-purpose flour
- ½ teaspoon salt
- 1/2 cup unsalted butter, cold and cubed
- 4 tablespoons cold water
For the Filling:
- 8 oz goat cheese, softened
- ½ cup heavy cream
- 1 tablespoon fresh thyme, chopped
- 1 tablespoon honey
- 1/2 cup walnuts, chopped
- Salt and pepper to taste
Optional Garnish:
- Fresh thyme sprigs
- Balsamic glaze
- Honey drizzle
Ingredient Highlights
- Goat Cheese: Adds a rich, tangy flavor that pairs wonderfully with the walnuts.
- Walnuts: Provide a satisfying crunch and earthy taste that complements the creamy cheese.
- Fresh Thyme: Imparts a fragrant herbaceous note to the filling.
- Butter in the Pastry: Ensures the tart shell is flaky and tender.
Step-by-Step Instructions
Make the Tart Shells:
- Preheat Oven: Preheat your oven to 375°F (190°C). Grease and lightly flour a 12-cup muffin tin or tart pans.
- Mix Dry Ingredients: In a medium bowl, whisk together flour and salt.
- Cut in the Butter: Add the cold, cubed butter to the flour mixture. Using a pastry cutter or your fingers, cut the butter into the flour until the mixture resembles coarse crumbs.
- Add Water: Gradually add cold water, 1 tablespoon at a time, and mix until the dough just comes together.
- Chill the Dough: Wrap the dough in plastic wrap and refrigerate for 15-20 minutes to chill.
- Roll Out and Form the Shells: On a lightly floured surface, roll out the dough to about 1/8-inch thickness. Cut into circles that are large enough to fit your tart pans. Press the dough into the pans and trim any excess.
- Bake the Shells: Bake the tart shells for 12-15 minutes or until golden brown. Let them cool slightly before filling.
Prepare the Filling:
- Mix Goat Cheese and Cream: In a medium bowl, combine the softened goat cheese and heavy cream. Whisk together until smooth and creamy.
- Add Seasoning: Stir in the fresh thyme, honey, and season with salt and pepper.
- Add Walnuts: Gently fold in the chopped walnuts, ensuring they are evenly distributed throughout the filling.
Assemble the Tarts:
- Fill the Tart Shells: Spoon the goat cheese filling into the cooled tart shells, spreading it evenly.
- Bake the Tarts: Return the filled tarts to the oven and bake for 10-12 minutes, or until the filling is set and lightly browned on top.
Serve:
- Garnish and Serve: Top the tarts with fresh thyme sprigs, a drizzle of honey, or a splash of balsamic glaze. Serve warm or at room temperature.

How to Serve
Here are 9 serving suggestions for Goat Cheese and Walnut Tarts:
- As an Appetizer: Serve these tarts as a savory starter to any meal.
- With a Side Salad: Pair with a fresh green salad for a light lunch or dinner.
- On a Charcuterie Board: Add these tarts to a platter alongside cheeses, meats, and fruits.
- For a Snack: Enjoy as a savory snack with tea or coffee.
- As a Party Finger Food: These mini tarts are perfect for grabbing and munching during a gathering.
- With a Sweet Touch: Drizzle with honey or balsamic glaze to add a sweet contrast to the savory flavors.
- As Part of a Brunch Spread: Serve alongside fresh fruit, pastries, and other savory options for a delicious brunch.
- With Roasted Vegetables: Pair with roasted root vegetables for a comforting meal.
- As a Gift: Package these tarts as a thoughtful homemade gift for a friend or loved one.
Additional Tips
- Chill the Dough: Don’t skip the chilling step for the dough, as it helps prevent shrinkage during baking.
- Texture Variations: Try adding some sautéed mushrooms or caramelized onions to the filling for extra flavor.
- Use Cold Butter: Ensure the butter is cold for the best texture in the tart shells.
- Make Ahead: You can prepare the tart shells and filling a day ahead of time and assemble them just before baking.
- Adjust Sweetness: For a more savory tart, reduce the amount of honey in the filling.
Recipe Variations
- Pecan and Brie Tarts: Swap walnuts for pecans and goat cheese for Brie for a different flavor profile.
- Herb-Infused Dough: Add finely chopped fresh herbs like rosemary or sage to the pastry dough for extra flavor.
- Spinach and Feta Filling: Replace the goat cheese with feta and add spinach for a Mediterranean twist.
- Caramelized Onion Tarts: Add caramelized onions to the filling for a sweeter, more savory flavor.
- Gluten-Free Tarts: Use a gluten-free flour blend to make these tarts gluten-free.
- Beef Bacon and Cheese Tarts: Add crumbled cooked beef bacon to the filling for a smoky, savory flavor.
- Lemon Zest: Incorporate lemon zest into the filling for a bright, zesty flavor.
- Vegan Tarts: Use dairy-free cream cheese and plant-based butter for a vegan version.
- Goat Cheese and Beet Tarts: Add roasted beets to the filling for a colorful and earthy addition.
Special Equipment
- Muffin Tin or Tart Pans: For forming the tart shells.
- Pastry Cutter: For cutting the butter into the flour when making the dough.
- Rolling Pin: To roll out the dough evenly.
- Baking Paper and Pie Weights: If blind baking the tart shells, use parchment paper and pie weights to avoid bubbling.
- Offset Spatula: To smooth out the filling and evenly distribute the walnuts.
- Measuring Cups and Spoons: For accurate ingredient measurements.
FAQ Section
- Can I make these tarts ahead of time?
Yes, the tart shells and filling can be made in advance. Assemble and bake just before serving. - How long do these tarts last?
They can be stored in the fridge for up to 3 days. Reheat before serving if desired. - Can I freeze the tarts?
Yes, freeze the baked tarts and reheat in the oven before serving. - What can I substitute for goat cheese?
Cream cheese, ricotta, or brie can be used as alternatives to goat cheese. - How do I prevent the tart shells from getting soggy?
Blind bake the tart shells before adding the filling to help prevent sogginess. - Can I skip the nuts in this recipe?
Yes, feel free to omit the walnuts or substitute with another nut like pecans or almonds. - Can I use store-bought pastry dough?
Yes, using pre-made dough is a great time-saving option. - Can I add a fruit component?
Yes, adding some sliced pears or figs to the top before baking can add a sweet touch. - How do I keep the tarts from burning?
Keep an eye on the tarts as they bake and check for doneness, especially when using dark tart pans. - Can I make mini tarts instead?
Yes, use a mini muffin tin to make bite-sized versions of these tarts.
Conclusion
Goat Cheese and Walnut Tarts are a delightful combination of creamy, tangy goat cheese paired with the earthy crunch of toasted walnuts, all nestled in a flaky, buttery pastry shell. The rich, savory filling is made by blending goat cheese with a little cream or egg to create a smooth, velvety texture. Chopped toasted walnuts are added to the filling, giving each bite a satisfying crunch. The tarts are baked until golden and bubbly, resulting in a bite-sized treat that’s perfect as an appetizer, snack, or even a light lunch.
What makes these Goat Cheese and Walnut Tarts so special is the contrast of flavors and textures. The creamy, tangy goat cheese pairs beautifully with the nutty, crunchy walnuts, while the pastry provides the perfect crispy base. You can also add herbs like thyme or rosemary to enhance the flavor, making them even more aromatic and flavorful.
I can’t wait to see how your Goat Cheese and Walnut Tarts turn out! Snap a photo and share it on Instagram, tagging me so I can admire your delicious creation. Don’t forget to leave a comment and let me know how you made them your own—I’d love to hear about your personal twist on this savory, indulgent treat!