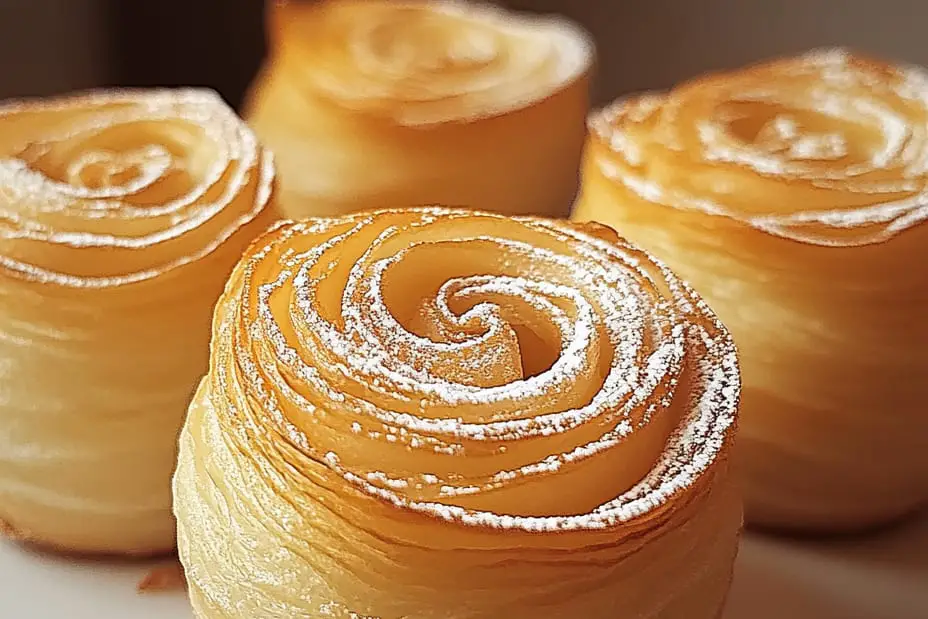
Cruffins: A Sweet and Flaky Pastry Delight, epitomize the magic of fusion baking. These delectable pastries, which combine elements of croissants and muffins, offer a delightful blend of flaky texture and sweetness. The first bite reveals layers of buttery goodness, filled with delightful flavors that make them incredibly hard to resist. If you’ve never tried a cruffin, prepare yourself for an amazing culinary experience!
In a world where traditional pastries can often feel overly familiar, cruffins bring a new twist that excites the palate. Their flaky layers, reminiscent of a perfectly baked croissant, cradling rich, gooey fillings will dazzle your taste buds. Whether enjoyed for breakfast, brunch, or as a delightful afternoon treat, cruffins stand out as a unique and creative pastry option. You can fill them with anything from chocolate ganache to fruit preserves or cream cheese. The versatility of these pastries invites creativity in the kitchen and allows you to gift your loved ones with a delightful treat that feels both nostalgic and modern.
As we explore the world of cruffins, this guide will not only provide you with a comprehensive recipe but also share the secrets to achieving the perfect flaky layers, that signature rise, and flavorful fillings that will leave everyone impressed. Get ready to embark on a baking adventure that will elevate your skills and delight your taste buds!
Why You’ll Love This Recipe
The allure of cruffins lies in their intricate layers and endless filling possibilities. You may find yourself falling in love with this recipe for several key reasons:
1. Unique Flavor Combinations: The flexibility in fillings allows you to be as adventurous as you like. Try different jams, creams, or even savory fillings!
2. Flaky and Buttery: Each bite gives a satisfying crunch followed by a soft, buttery interior that melts in your mouth.
3. Eye-Catching Presentation: Cruffin’s unique shape makes it visually appealing, perfect for impressing guests or spoiling yourself.
4. Easy to Customize: Whether you want them sweet or savory, you can tailor the recipe to fit your taste preferences.
5. Perfect for Any Gathering: These pastries shine at brunches, parties, or just a cozy afternoon tea.
6. Fun to Make: The process of rolling, folding, and filling is enjoyable and rewarding, making it a perfect baking project.
With these delightful qualities in mind, it’s easy to see why cruffins are not just a treat; they’re an experience that can spark joy and creativity in your kitchen!
Preparation and Cooking Time
Making cruffins is a rewarding but time-intensive process. Here’s how the time breaks down:
– Preparation Time: 30 minutes
– Proofing Time: 1 hour and 30 minutes
– Baking Time: 20-25 minutes
– Cooling Time: 10 minutes
In total, you will invest about 2 hours and 10 minutes in creating these delightful pastries. While the proofing time may require some patience, the results are absolutely worth it!
Ingredients
– 2 cups all-purpose flour
– 3 tablespoons granulated sugar
– 1 teaspoon salt
– 1 teaspoon instant yeast
– 1/2 cup whole milk
– 1/2 cup water
– 1/4 cup unsalted butter, melted
– 1 1/2 cups unsalted butter (for lamination)
– Filling of choice (chocolate chips, fruit preserves, cream cheese, etc.)
– Powdered sugar (for dusting)
Step-by-Step Instructions
Creating cruffins might seem complex, but following these straightforward steps will lead you to success:
1. Mix Dry Ingredients: In a large bowl, combine the all-purpose flour, sugar, salt, and instant yeast.
2. Warm Liquids: Gently heat the whole milk and water in a saucepan until warm (not boiling). Remove from heat.
3. Combine Wet and Dry: Pour the warm liquids and melted butter into the dry ingredients. Stir until a dough begins to form.
4. Knead Dough: Turn the dough onto a floured surface and knead for about 5-7 minutes until smooth.
5. First Rise: Place the kneaded dough in a greased bowl, cover it with plastic wrap, and let it rise for about 1 hour or until doubled in size.
6. Prepare Butter for Laminating: While the dough rises, prepare the 1 ½ cups of unsalted butter by placing it between two sheets of parchment paper. Roll it into a rectangle about 1/2 inch thick and refrigerate.
7. Roll Dough: After the dough has doubled, punch it down and turn it onto a floured surface. Roll it out to a rectangle, about double the size of the butter slab.
8. Incorporate Butter: Place the chilled butter slab in the center of the dough rectangle. Fold the dough over the butter, completely encasing it.
9. Laminating Process: Roll out the dough with butter enclosed into a long rectangle, then fold it into thirds (like a letter). Wrap in plastic wrap and refrigerate for 30 minutes.
10. Repeat the Lamination: Repeat the rolling and folding process two more times for maximum flakiness, refrigerating for 30 minutes between each fold.
11. Final Roll: After the final fold, roll the dough out to a rectangle and cut into strips (about 2 inches wide).
12. Add Filling: Add your chosen filling onto each strip. Roll the dough up tightly, starting from one end, and pinch to seal the edges.
13. Shape into Muffin Tin: Place each rolled-up cruffin into a greased muffin tin. Leave room between each for rising.
14. Second Rise: Cover the muffin tin with a kitchen towel and let the cruffins rise for another 30 minutes.
15. Preheat Oven: Preheat your oven to 375°F (190°C).
16. Bake: Once risen, bake the cruffins for 20-25 minutes or until they are golden brown.
17. Cool: Remove from the oven and allow them to cool for 10 minutes in the pan before transferring to a wire rack.
18. Dust with Sugar: Finally, dust the tops with powdered sugar for an elegant finish.
By following these steps, you’ll achieve flaky, layered cruffins filled with deliciousness!
How to Serve
When it comes to serving your cruffins, presentation and accompaniments can make all the difference. Here are some serving tips:
1. Presentation: Arrange them on a beautiful serving platter. A stand can elevate their visual appeal.
2. Accompaniments: Offer a selection of toppings such as whipped cream, fresh fruit, or a drizzle of chocolate sauce to enhance the experience.
3. Beverage Pairing: Serve with coffee, tea, or a glass of milk for a comforting treat.
4. Sharing is Caring: These pastries are perfect for sharing! Cut in half to reveal the beautiful layers and fillings, creating an inviting presentation.
5. For Any Occasion: Cruffins are versatile enough for every kind of gathering. Whether at brunch, a casual afternoon, or a special event, they are sure to impress guests.
With these serving suggestions, you’ll ensure that your cruffins are not only delicious but also a feast for the eyes! Enjoy the experience of making and sharing these incredible pastries with friends and family. They will surely become a cherished recipe in your baking repertoire.
Additional Tips
– Use High-Quality Ingredients: The quality of your flour and butter will significantly impact the final taste. Fresh ingredients yield the best flavors.
– Let the Dough Rest: After kneading, allowing the dough to rest can improve its elasticity and make rolling easier.
– Keep Butter Cold: During the lamination process, ensure the butter remains cold. This will help achieve those flaky layers.
– Experiment with Fillings: Don’t hesitate to try different fillings. From savory cheeses to rich chocolate, your options are limitless!
– Brush with Egg Wash: For a glossy finish, brush the tops of the cruffins with an egg wash (1 egg mixed with a tablespoon of water) before baking.
Recipe Variation
The beauty of cruffins is their versatility. Here are some variations to consider:
1. Savory Cruffins: Use cheese and herbs as fillings for a savory twist. Consider combinations like goat cheese and rosemary or cheddar and jalapeño.
2. Fruity Cruffins: Incorporate seasonal fruits such as berries or apples along with your usual fillings for bursts of flavor.
3. Spiced or Flavored Dough: Add spices like cinnamon or nutmeg to the dough for an added depth of flavor.
4. Chocolate Hazelnut: Swap out regular fillings for chocolate hazelnut spread for a decadent treat.
Freezing and Storage
– Storage: Keep your freshly baked cruffins in an airtight container at room temperature for up to 3 days. This will help maintain their flakiness.
– Freezing: Cruffins can be frozen for up to 3 months. Place them in a zip-lock bag once completely cooled. Thaw at room temperature before serving.
Special Equipment
To successfully create cruffins, you will need a few essential items:
– A large mixing bowl for combining ingredients
– A rolling pin for rolling dough
– Parchment paper for laminating butter
– A muffin tin for baking
– Plastic wrap for covering the dough during proofing
Frequently Asked Questions
What can I do if my dough is too sticky?
If your dough is sticky, sprinkle in a little more flour gradually while kneading until it reaches the desired consistency.
Can I use store-bought pastry dough?
Yes, using store-bought puff pastry can save time, but the texture and taste will vary slightly from homemade cruffins.
How do I know they’re done baking?
Cruffins are done when they are golden brown on top. A toothpick inserted into the center should come out clean.
Are cruffins suitable for special diets?
You can create gluten-free cruffins by using a gluten-free flour blend, and vegan substitutes can be employed for butter and milk.
Can I make these ahead of time?
Absolutely! You can prepare the dough a day beforehand and store it in the refrigerator overnight. Simply shape and bake when you’re ready.
Conclusion
Cruffins: A Sweet and Flaky Pastry Delight, offer an enticing blend of flavors and textures. The satisfying crunch of the outer layers leads to a buttery dream within, making them a true pastry experience. By experimenting with flavors and fillings, you can personalize your cruffins for any occasion. Their unique shape and presentation make them perfect for brunch gatherings or a sweet evening treat. Enjoy the joyful baking process, and delight in sharing your creations with friends and family!
Cruffins: An Amazing Ultimate Pastry Delight with 7 Layers
- Total Time: 0 hours
Ingredients
– 2 cups all-purpose flour
– 3 tablespoons granulated sugar
– 1 teaspoon salt
– 1 teaspoon instant yeast
– 1/2 cup whole milk
– 1/2 cup water
– 1/4 cup unsalted butter, melted
– 1 1/2 cups unsalted butter (for lamination)
– Filling of choice (chocolate chips, fruit preserves, cream cheese, etc.)
– Powdered sugar (for dusting)
Instructions
Creating cruffins might seem complex, but following these straightforward steps will lead you to success:
1. Mix Dry Ingredients: In a large bowl, combine the all-purpose flour, sugar, salt, and instant yeast.
2. Warm Liquids: Gently heat the whole milk and water in a saucepan until warm (not boiling). Remove from heat.
3. Combine Wet and Dry: Pour the warm liquids and melted butter into the dry ingredients. Stir until a dough begins to form.
4. Knead Dough: Turn the dough onto a floured surface and knead for about 5-7 minutes until smooth.
5. First Rise: Place the kneaded dough in a greased bowl, cover it with plastic wrap, and let it rise for about 1 hour or until doubled in size.
6. Prepare Butter for Laminating: While the dough rises, prepare the 1 ½ cups of unsalted butter by placing it between two sheets of parchment paper. Roll it into a rectangle about 1/2 inch thick and refrigerate.
7. Roll Dough: After the dough has doubled, punch it down and turn it onto a floured surface. Roll it out to a rectangle, about double the size of the butter slab.
8. Incorporate Butter: Place the chilled butter slab in the center of the dough rectangle. Fold the dough over the butter, completely encasing it.
9. Laminating Process: Roll out the dough with butter enclosed into a long rectangle, then fold it into thirds (like a letter). Wrap in plastic wrap and refrigerate for 30 minutes.
10. Repeat the Lamination: Repeat the rolling and folding process two more times for maximum flakiness, refrigerating for 30 minutes between each fold.
11. Final Roll: After the final fold, roll the dough out to a rectangle and cut into strips (about 2 inches wide).
12. Add Filling: Add your chosen filling onto each strip. Roll the dough up tightly, starting from one end, and pinch to seal the edges.
13. Shape into Muffin Tin: Place each rolled-up cruffin into a greased muffin tin. Leave room between each for rising.
14. Second Rise: Cover the muffin tin with a kitchen towel and let the cruffins rise for another 30 minutes.
15. Preheat Oven: Preheat your oven to 375°F (190°C).
16. Bake: Once risen, bake the cruffins for 20-25 minutes or until they are golden brown.
17. Cool: Remove from the oven and allow them to cool for 10 minutes in the pan before transferring to a wire rack.
18. Dust with Sugar: Finally, dust the tops with powdered sugar for an elegant finish.
By following these steps, you’ll achieve flaky, layered cruffins filled with deliciousness!
- Prep Time: 30 minutes
- Cook Time: 20-25 minutes
Nutrition
- Serving Size: 12 cruffins
- Calories: 220 kcal per cruffin
- Fat: 10g
- Protein: 3g