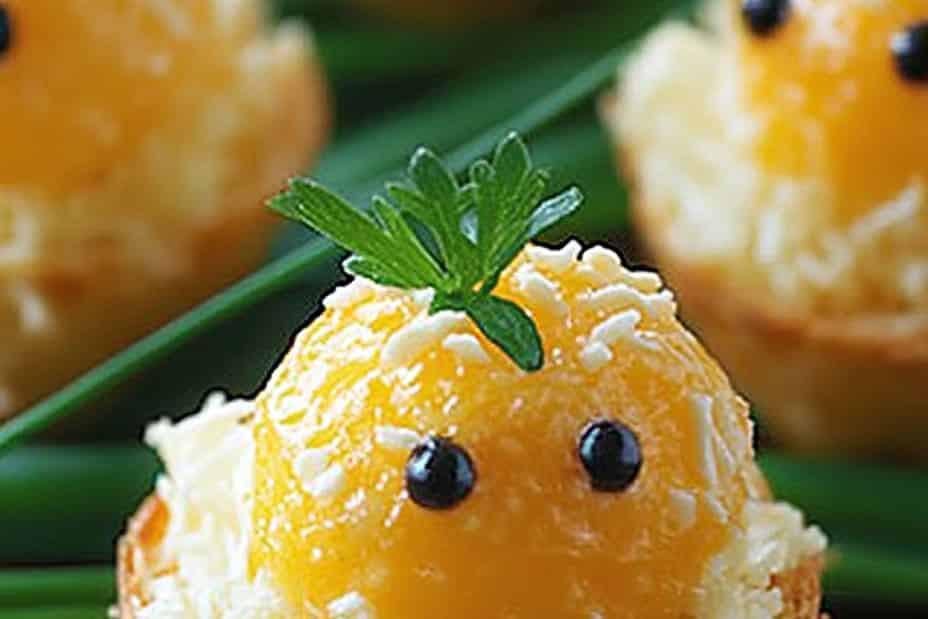
Cheesy Chicks Mini Cheese Balls are the perfect choice for your Easter gatherings. These delightful, bite-sized treats burst with flavor, combining creamy cheese and exciting ingredients that everyone will love. Their playful shape makes them a fun addition to any festive table, captivating both kids and adults alike. Whether you’re hosting a brunch, a dinner, or a casual get-together, these mini cheese balls are sure to delight your guests.
These cheese balls are not just aesthetically pleasing; they are also incredibly delicious. With a rich, cheesy filling and a crisp outer coating, they provide a wonderful contrast of textures. What makes them truly special is how easy they are to prepare. You can whip these up in no time, allowing you to spend more time enjoying the company of your friends and family.
Imagine serving a platter of these Cheesy Chicks Mini Cheese Balls while your guests gather around, amused by their charming appearance. As people take their first bite, the creamy cheese mingling with the flavors of herbs and spices will create delightful expressions of amazement. This recipe combines simplicity and creativity, ensuring a delightful addition to your Easter celebrations.
Are you ready to elevate your aperitif game this holiday season? Let’s dive into why you’ll love this recipe, the preparation time, and all the necessary ingredients to create your own Cheesy Chicks Mini Cheese Balls.
Why You’ll Love This Recipe
Cheesy Chicks Mini Cheese Balls come with an array of benefits that make them a must-try for your upcoming Easter event. Here are some compelling reasons why you’ll adore this recipe:
1. Fun Presentation: The adorable chick shape makes them eye-catching and festive, perfect for Easter.
2. Versatile Flavors: You can customize the flavors according to your personal taste. Mix in your favorite herbs, spices, or add-chopped vegetables for extra crunch.
3. Easy to Make: With straightforward instructions, even novice cooks can create these delightful treats with confidence.
4. Perfect Party Food: These cheese balls can be made ahead of time and served cold, making them ideal for busy hosts.
5. Kid-Friendly: Children love their fun shapes and cheesy flavors, making it a hit among younger guests.
6. Crowd-Pleaser: Whether it’s an appetizer, a snack, or part of a buffet, these mini cheese balls will disappear quickly!
By incorporating these mini cheese balls into your Easter festivities, you’re not just serving food; you’re creating a cheerful atmosphere filled with laughter and enjoyment.
Preparation and Cooking Time
Making Cheesy Chicks Mini Cheese Balls is a quick and easy process. Here’s a breakdown of the time needed to prepare and serve these delightful aperitifs:
– Preparation Time: 25 minutes
– Chilling Time: 30 minutes
– Total Time: 55 minutes
This timeline allows you to plan accordingly for your event, ensuring everything runs smoothly while you have fun!
Ingredients
– 8 oz cream cheese, softened
– 1 cup shredded cheddar cheese
– 1/4 cup grated Parmesan cheese
– 1/4 cup finely chopped green onions
– 1/4 cup finely chopped red bell pepper
– 1/2 tsp garlic powder
– 1/2 tsp onion powder
– 1/4 tsp smoked paprika
– Salt and pepper, to taste
– 1/2 cup crushed crackers or breadcrumbs for coating
– Decorative small pieces of black olives or peppercorns for eyes
– Fresh parsley or chives for garnish
Step-by-Step Instructions
Creating Cheesy Chicks Mini Cheese Balls can be a fun activity to do, especially if you have family or friends helping you out. Follow these simple steps:
1. Prepare the Base: In a mixing bowl, combine the softened cream cheese, shredded cheddar cheese, grated Parmesan cheese, chopped green onions, red bell pepper, garlic powder, onion powder, smoked paprika, salt, and pepper. Mix thoroughly until all ingredients are well incorporated.
2. Shape the Cheese Balls: Using your hands, scoop out about a tablespoon of the cheese mixture. Roll it into a small ball. Place it on a tray. Repeat until all the mixture is shaped into balls.
3. Chill: Cover the tray with plastic wrap and refrigerate for about 30 minutes. This step firms up the cheese balls, making them easier to coat.
4. Coat the Cheese Balls: Once chilled, roll each cheese ball in the crushed crackers or breadcrumbs until well coated. This adds a delightful crunch and texture.
5. Add Eyes: Use the black olives or peppercorns to create eyes on each cheese ball, pressing them gently into the cheese.
6. Garnish: Arrange the cheese balls on a serving platter. Sprinkle fresh parsley or chives around the base to create a festive look.
7. Serve: Feel free to serve with an assortment of crackers, fresh vegetables, or your off-the-menu dip, enhancing the experience!
How to Serve
Serving Cheesy Chicks Mini Cheese Balls can be a delightful experience for both you and your guests. Here are some tips on presenting these delicious aperitifs:
1. Platter Presentation: Use a colorful platter to present the cheese balls. Arrange them in a circular pattern with green leaves or herbs in the center to add vibrancy.
2. Dip Options: Provide a variety of dips such as ranch dressing, salsa, or a spicy ketchup to complement the flavors of the cheese balls.
3. Garnish with Fresh Ingredients: Add cherry tomatoes, cucumber slices, or carrot sticks on the platter. They not only add color but also provide a healthy option for guests.
4. Serving Size: Offer the cheese balls in small portions, encouraging guests to take a few and ensuring that they don’t feel overwhelmed by a large serving.
5. Festive Touch: Use Easter-themed decorations around the cheese ball platter, such as mini eggs or bunny figurines, to enhance the holiday spirit.
With these serving suggestions, your Cheesy Chicks Mini Cheese Balls will not only be a hit for their flavor but will also create a delightful ambience that welcomes joyous conversations and laughter around the table.
Cheesy Chicks Mini Cheese Balls are an incredible addition to any Easter menu. With their charming design and delightful taste, they promise to become a cherished tradition in your family gatherings. Enjoy these mini delights, and watch them bring smiles to the faces of everyone at your home this Easter!
Additional Tips
– Use the Best Cheese: For the richest flavor, opt for high-quality cream cheese and cheddar. Fresh cheese can elevate the overall taste.
– Experiment with Coatings: Instead of crushed crackers, try using finely chopped nuts or seeds for a unique crunch and flavor.
– Spice it Up: Consider adding a pinch of cayenne or your favorite hot sauce to the cheese mixture for a zesty kick.
Recipe Variation
Feel free to customize your Cheesy Chicks Mini Cheese Balls! Here are a few fun variations to try:
1. Herbal Infusion: Add fresh herbs like dill or basil to enhance the flavor profile.
2. Spicy Version: Incorporate diced jalapeños or crushed red pepper for a spicy twist.
3. Sweet Addition: Mix in some finely chopped apricots or cranberries for a contrast of sweetness and added texture.
Freezing and Storage
– Storage: Keep the cheese balls in an airtight container in the refrigerator. They can last for up to a week.
– Freezing: If you want to make them ahead, freeze the cheese balls on a baking sheet. Once frozen, transfer them into a freezer bag for up to three months. Thaw before serving.
Special Equipment
To prepare the Cheesy Chicks Mini Cheese Balls successfully, here are some essential tools you may need:
– Mixing bowls
– Hand mixer or fork for combining ingredients
– Cookie scoop or tablespoon for shaping
– Plastic wrap for chilling
– Baking tray for rolling and setting the cheese balls
Frequently Asked Questions
Can I use low-fat cream cheese?
Yes, you can use low-fat cream cheese, though it may slightly change the texture of the cheese balls.
How early can I make these?
You can prepare them a day in advance; just be sure to store them in the fridge until serving.
Can I make them larger?
Absolutely! Just know that larger cheese balls may require a longer chilling period to firm up.
How can I ensure they hold their shape?
Make sure to chill the cheese balls adequately before coating them. This will help them stay firm and retain their shape during serving.
Conclusion
Cheesy Chicks Mini Cheese Balls are not only a fun and flavorful addition to your Easter festivities, but they are also simple to prepare. These delectable bites transform an ordinary gathering into a festive occasion filled with laughter and joy. By incorporating your own twist and some creative garnishes, you can make these treats uniquely yours. Trust us; they will quickly become a cherished part of your holiday traditions!

Cheesy Chicks Mini Cheese Balls: An Amazing Ultimate Easter Aperitif 3
- Total Time: 25 minutes
Ingredients
– 8 oz cream cheese, softened
– 1 cup shredded cheddar cheese
– 1/4 cup grated Parmesan cheese
– 1/4 cup finely chopped green onions
– 1/4 cup finely chopped red bell pepper
– 1/2 tsp garlic powder
– 1/2 tsp onion powder
– 1/4 tsp smoked paprika
– Salt and pepper, to taste
– 1/2 cup crushed crackers or breadcrumbs for coating
– Decorative small pieces of black olives or peppercorns for eyes
– Fresh parsley or chives for garnish
Instructions
Creating Cheesy Chicks Mini Cheese Balls can be a fun activity to do, especially if you have family or friends helping you out. Follow these simple steps:
1. Prepare the Base: In a mixing bowl, combine the softened cream cheese, shredded cheddar cheese, grated Parmesan cheese, chopped green onions, red bell pepper, garlic powder, onion powder, smoked paprika, salt, and pepper. Mix thoroughly until all ingredients are well incorporated.
2. Shape the Cheese Balls: Using your hands, scoop out about a tablespoon of the cheese mixture. Roll it into a small ball. Place it on a tray. Repeat until all the mixture is shaped into balls.
3. Chill: Cover the tray with plastic wrap and refrigerate for about 30 minutes. This step firms up the cheese balls, making them easier to coat.
4. Coat the Cheese Balls: Once chilled, roll each cheese ball in the crushed crackers or breadcrumbs until well coated. This adds a delightful crunch and texture.
5. Add Eyes: Use the black olives or peppercorns to create eyes on each cheese ball, pressing them gently into the cheese.
6. Garnish: Arrange the cheese balls on a serving platter. Sprinkle fresh parsley or chives around the base to create a festive look.
7. Serve: Feel free to serve with an assortment of crackers, fresh vegetables, or your off-the-menu dip, enhancing the experience!
- Prep Time: 25 minutes
- Cook Time: 0 minutes
Nutrition
- Serving Size: 20 mini cheese balls
- Calories: 90 kcal
- Fat: 7g
- Protein: 3g